Creating a new mailing
Learn how to create a new mailing, and edit existing drafts
- Click "Create New Mailing" to begin.

- You will be promoted to select the type of email that this Events Mailing is. After selecting the Email Type, click "Ok" to continue.
You'll find explanations of our templates below!
RSVP Follow Up
Generally used as an RSVP follow up to your initial RSVP Invitation email. Available templates will include the "Click to RSVP" button.
DeleteSeating Details
Generally used to send out QR Barcodes and Seat assignment information to your invitees. The QR Barcode can be used to scan and easily mark invitees as attended when using the Events Mobile App.
DeleteEvent Reminder
Generally used as an additional follow up or save the date. Available templates will include an "Edit RSVP" button.
DeleteCustom
Generally used however user would like. Available templates do not include any buttons to RSVP.
Delete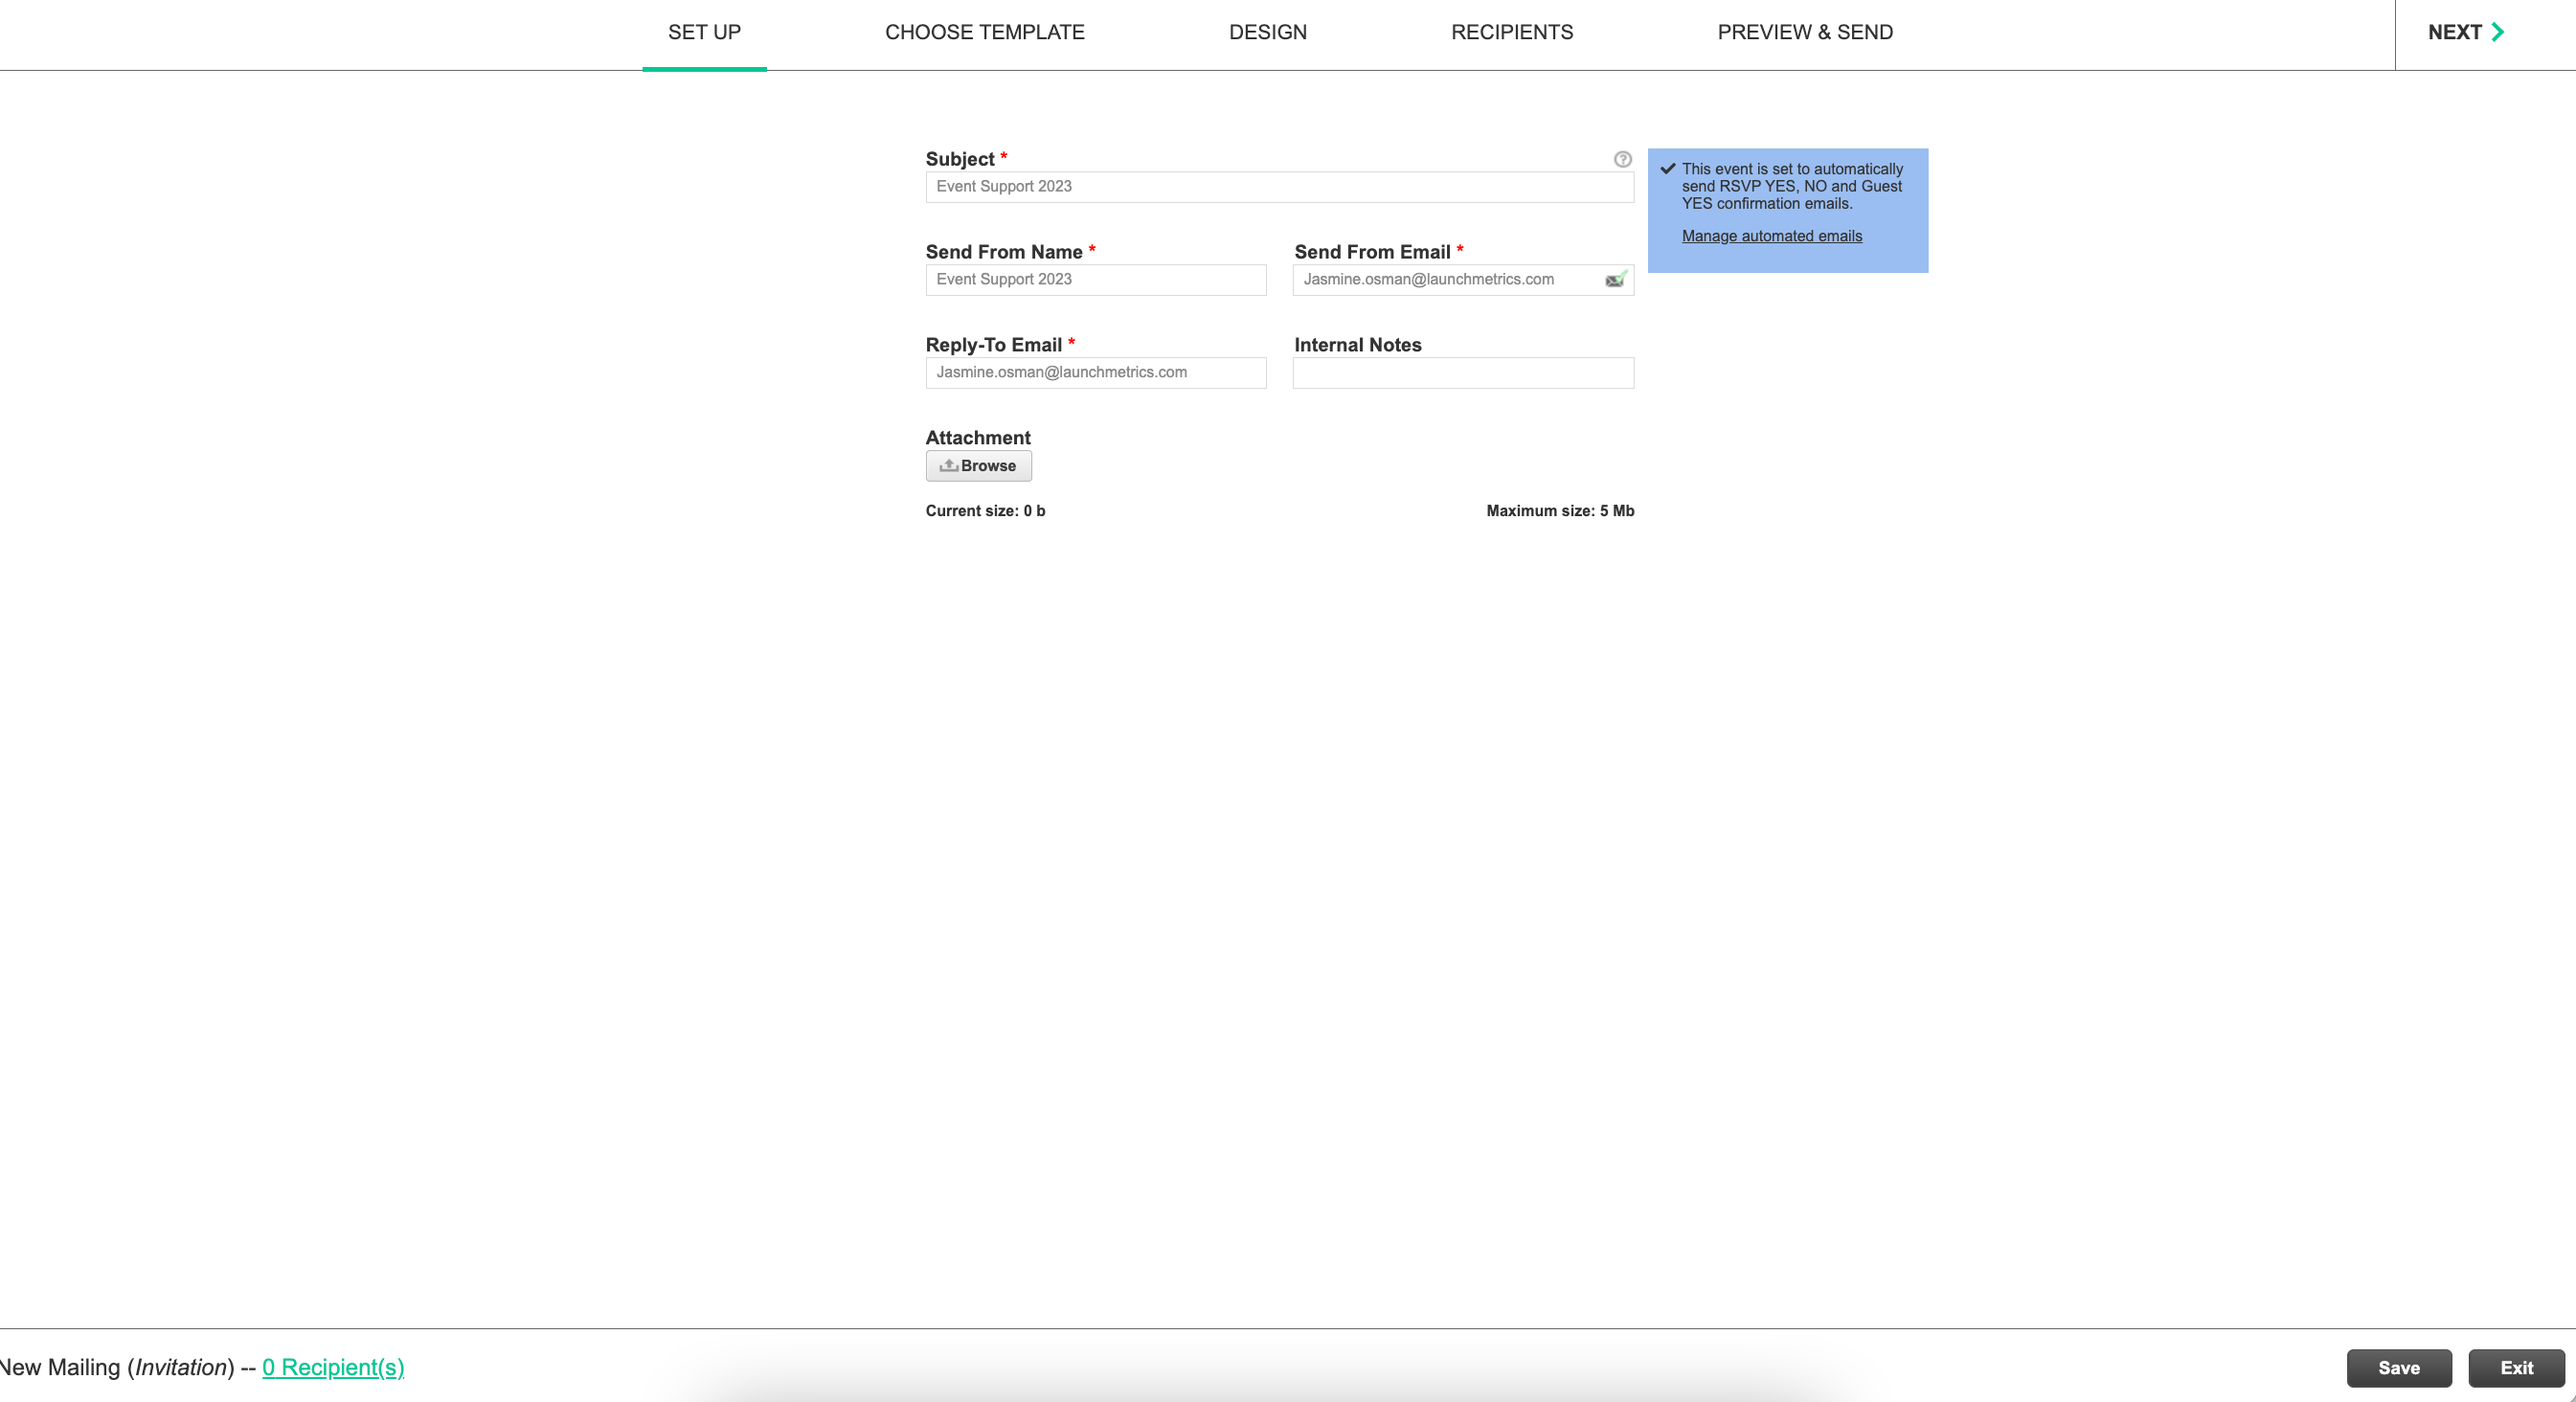
Set Up
This is where you will input the Subject of your email and the send from/reply to information.
You'll find explanations of our setup up options below!
Send From Name
By default this will populate the name of the user that is logged in and creating the email template. This can be edited to whatever name the mailer should look like it is coming from.
DeleteSend From Email
This is the email address that will be used to send out the mailing. You do want to have an email that is verified for anti-spam. To learn more about this click here.
DeleteReply-to Email
This is the email address that any reply to the mailer by a recipients will go to. The 'From Email' and the 'Reply to Email' do not need to be the same.
DeleteInternal Notes
This is optional and can be used to note anything specific about this mailing, for example "VIP Version with Discount Code".
DeleteAttachment Size
Each mailing template only allows a total of 5MB to be uploaded as an attachment. You can create a link that can direct recipients to download attachments in the "Design Section".
DeleteFooter Options
- Click the Recipients Link to build your Recipients list.
- Click "Save" to save your setup reciepients
- Click "Exit" to exit this page. Click Exit before save will not save the Set Up Details.
Header Options
- Click "Next" to move to the "Choose Template" page.
- Click any of the header options to jump directly to that section of the mailing process. (*Tabbing between steps automatically saves anything that's not yet saved as a draft.)
- Click "Next" when you have filled this information out.
Choose Template
- You will have the option to select a pre-created template.
- If you would like to create your own mailing from scratch, you have the option to click "Blank".
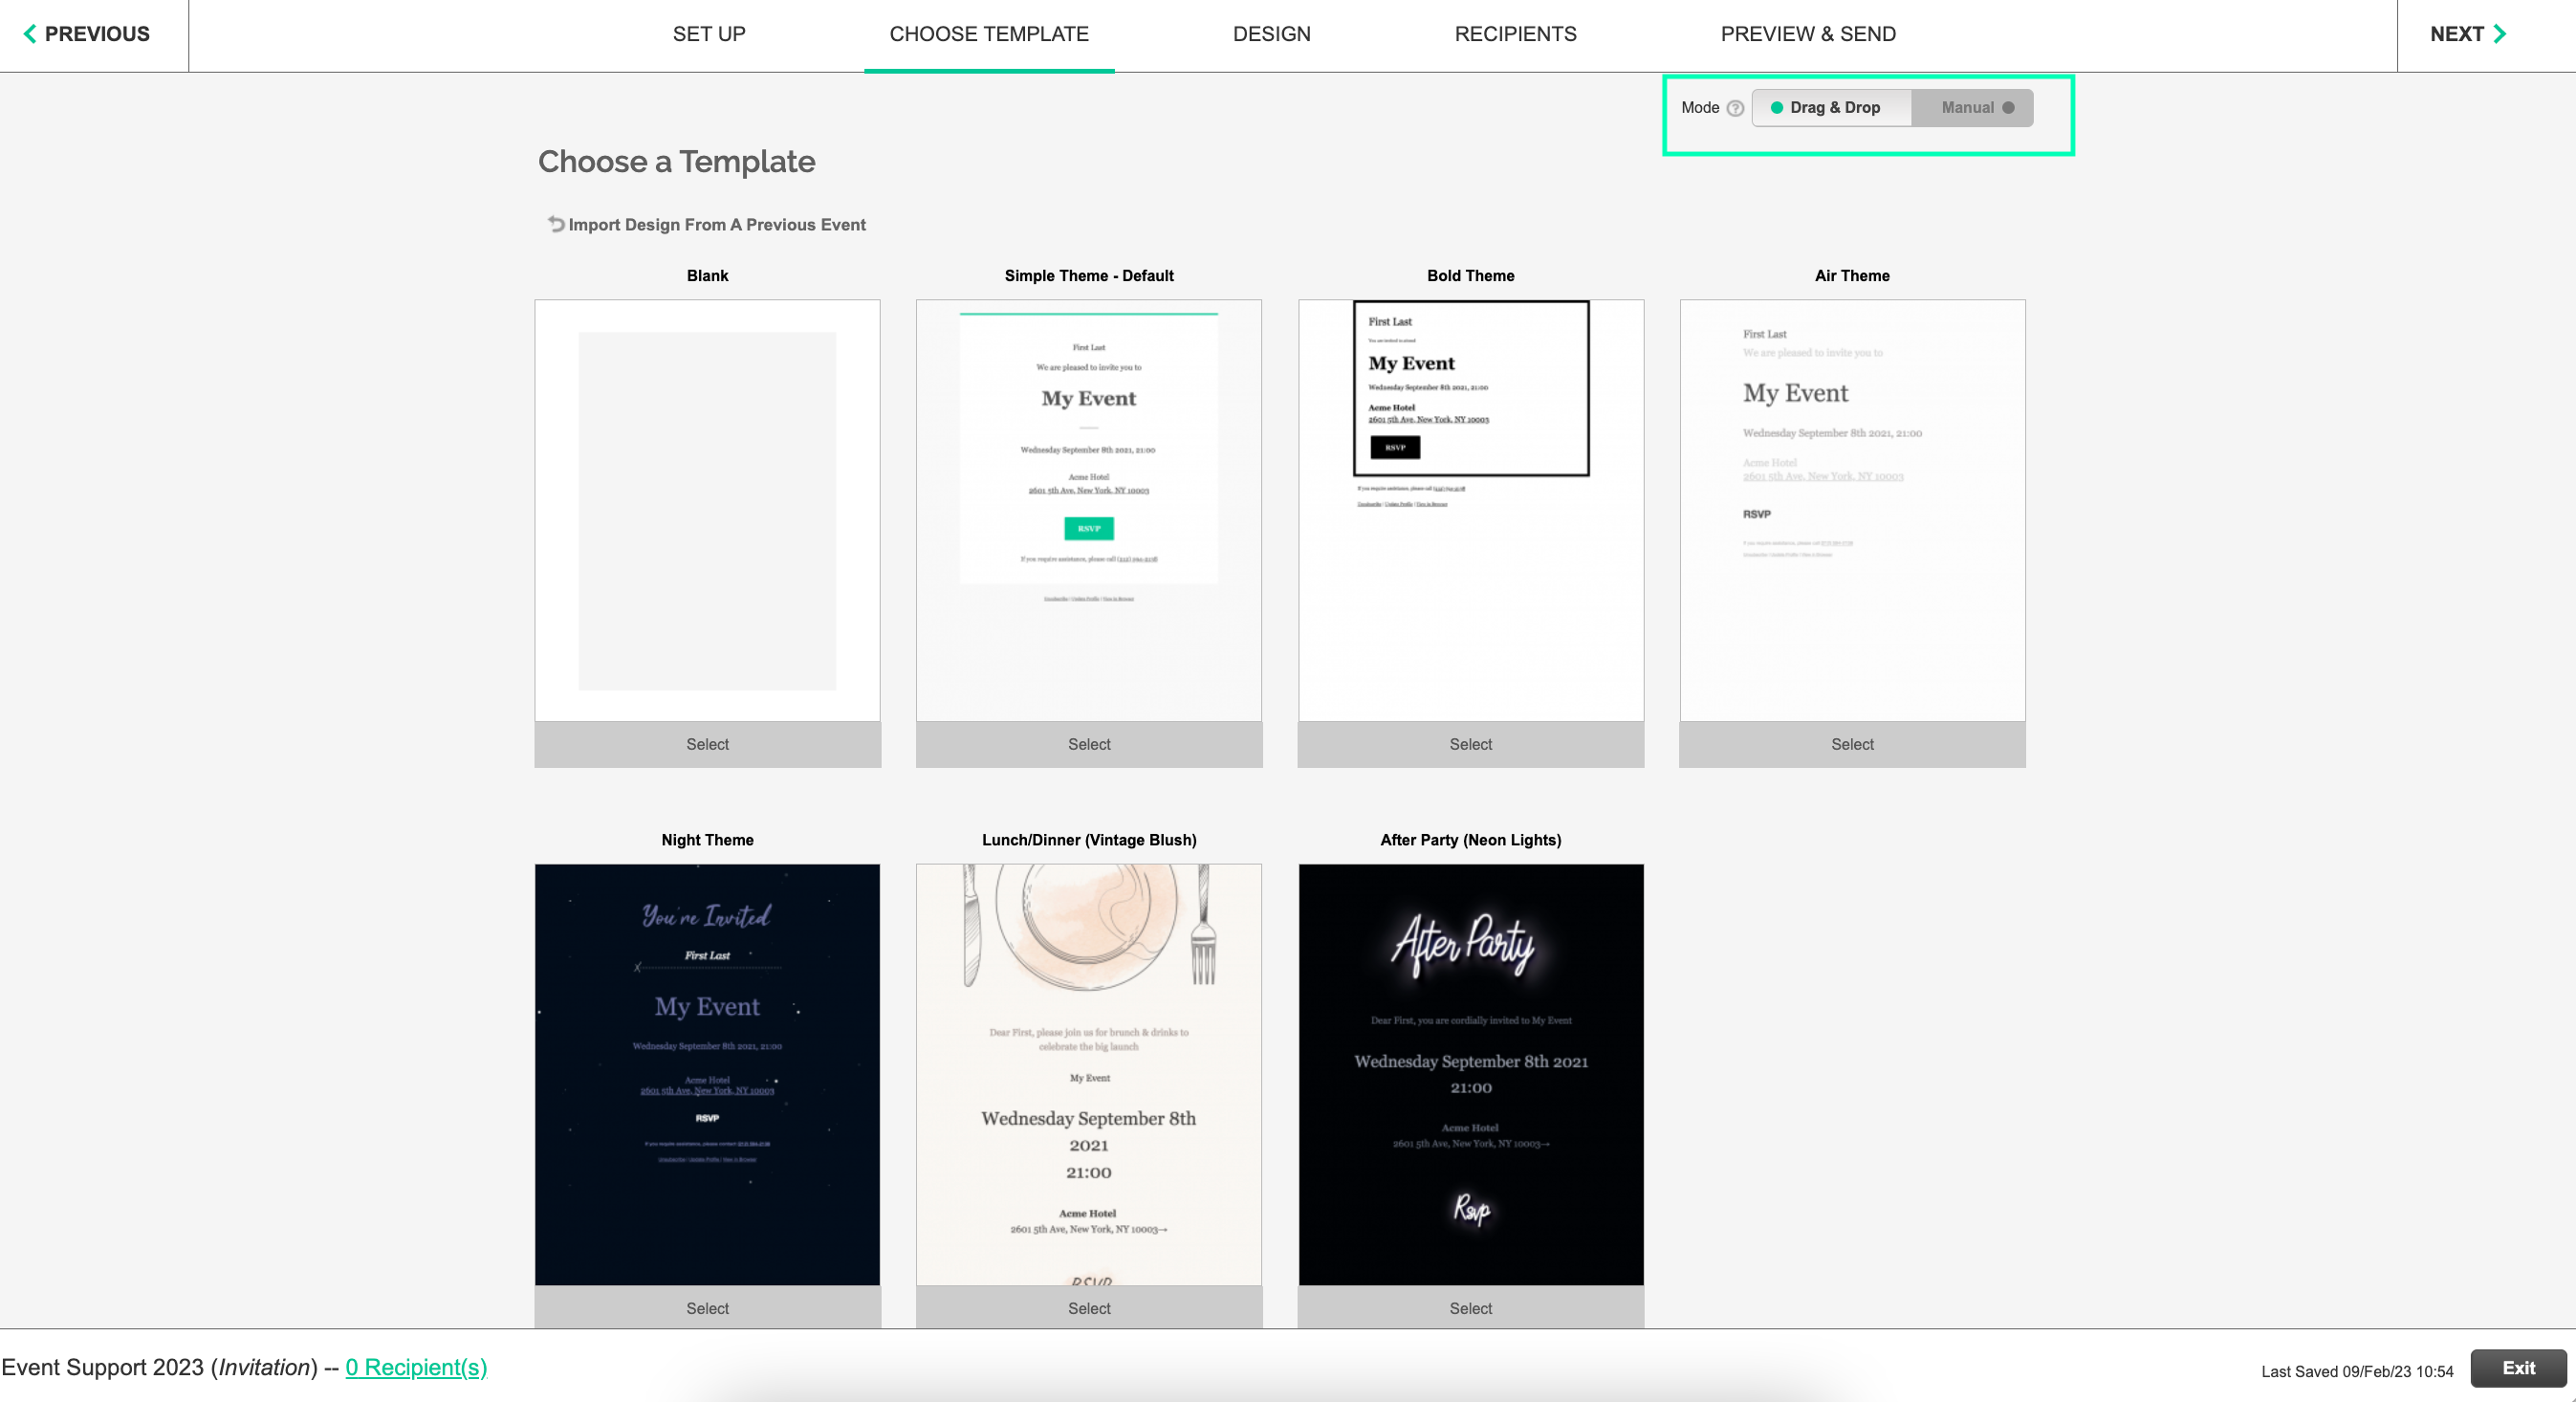
You'll find explanations of our Mode Selections / Templates below:
Drag & Drop
The default mode, which will allow you to drag and drop content within the Design section. This Mode is what this support article is referencing.
DeleteManual
Allows you to build your Events mailings using the older version of Launchmetrics Events Mailing. This is also recommended to use if you are coding the HTML externally and want to simply import the source code. For more information on this Manual mode, please click here for that support article.
DeleteRe-using a previous template
You can re-use a previously created mailing template, including templates from archived Events. You can do this by navigating to “Events Mailing” and clicking “Create New Mailing”. From here you'll have the option to click "Import from previous mailings". You can select any template you have in the platform whether it be in "Drafts", "Sent" or "Scheduled". You will notice the archived event have a [A] sign before the subject of the mailing.
- Once you have selected a template you're happy with, click "Next"
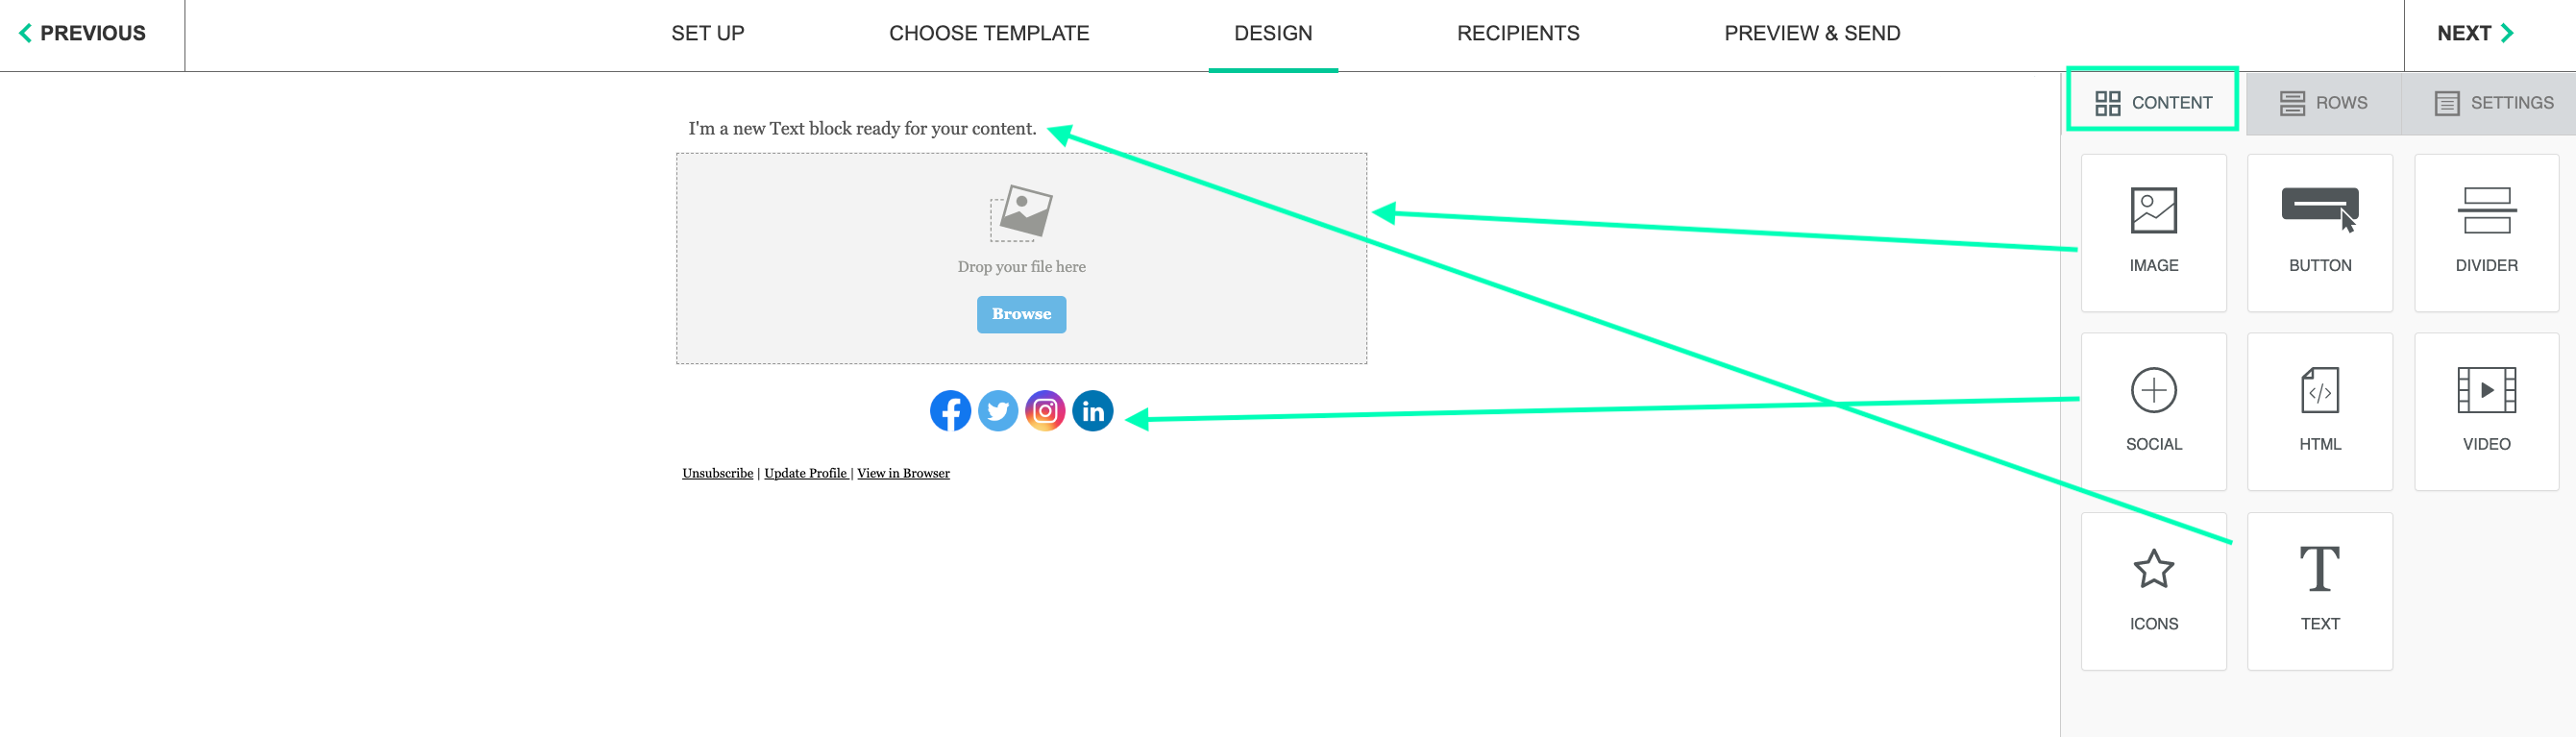
Design
- To start creating your mailing you will need to drag and drop from the "Contents" tab
-
IMAGE
- You can drag and drop images into the image content field for your image to be embedded into your mailer. You can upload any type of image excluding PDF's
- We also support GIF's, you can drag and drop a GIF as you would an image and the GIF will play within the mailer.
- Other ways you can add your image is to click "Browse". Use the File manager to import new images or select various images that have been previously saved by other users.
- You can drag and drop images into the image content field for your image to be embedded into your mailer. You can upload any type of image excluding PDF's
-
BUTTON
- You can drag and drop the button icon into your mailer and add a "special link" that allows your Invitees to RSVP directly from your mailer. This information will update in real time, in your Invitees manager (this is typically what the Button feature is used for).
-
Other options:
- Add a link to download a file
- If you have files that are exceed the 5MB limit to add as an attachment for each mailing contact, you can include a link to download a file directly in the body of the email.
- Add a button element by dragging it from the content panel on the right.
- Click on the button to activate the content properties panel . Look for the "Actions" section. Click on "Link File".
- This will load your file manager. From, here upload your file
- If you have files that are exceed the 5MB limit to add as an attachment for each mailing contact, you can include a link to download a file directly in the body of the email.
- Add a link to download a file
-
Note: There is a 12MB per file limit to upload.
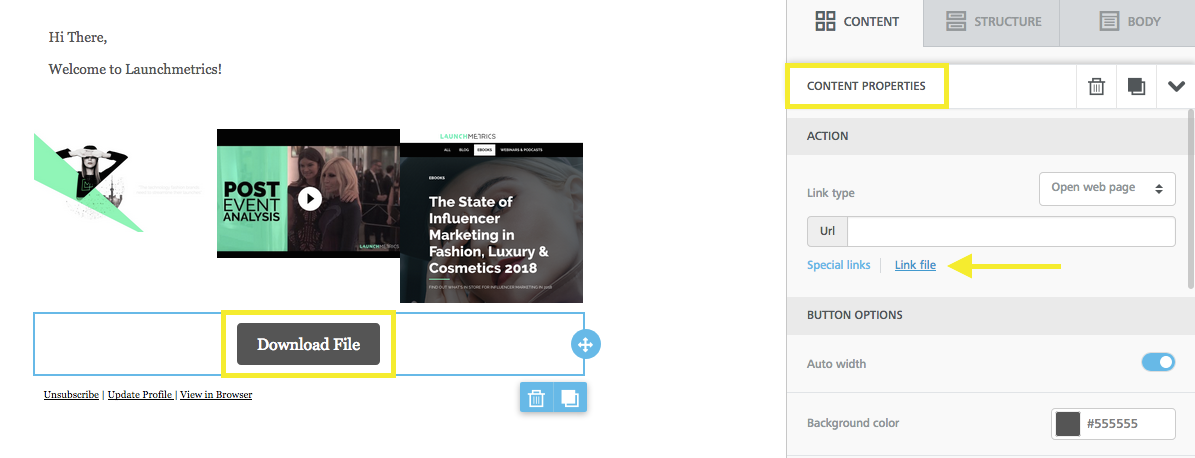
- Then Click the "Insert" button to link it back to the button.
- Once this is one done, your recipients will have the file automatically downloaded once they click on the button.
- Then Click the "Insert" button to link it back to the button.
Click for how to insert the RSVP link to the button icon
- To add the RSVP link to your Button you will need to Drag and drop the button onto your mailer, and click the Button.
- This will bring up format option on the right hand side of your screen.
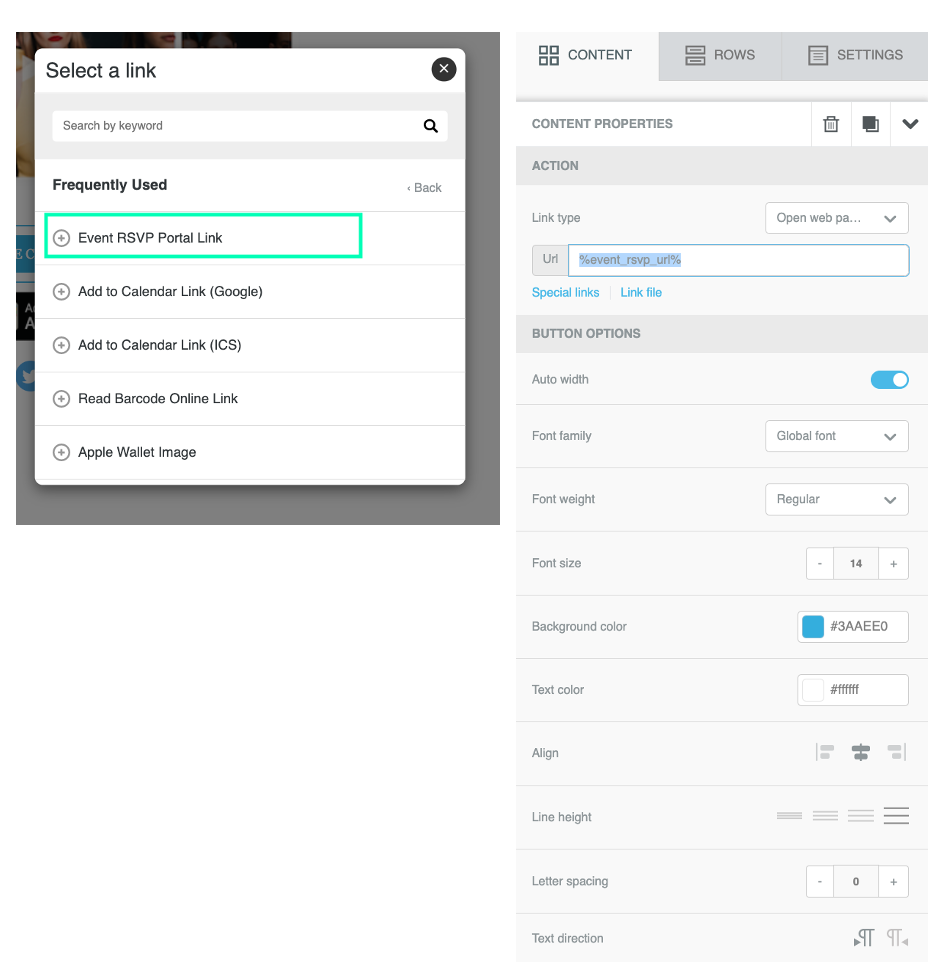
- You will need to click the "Special Links" button
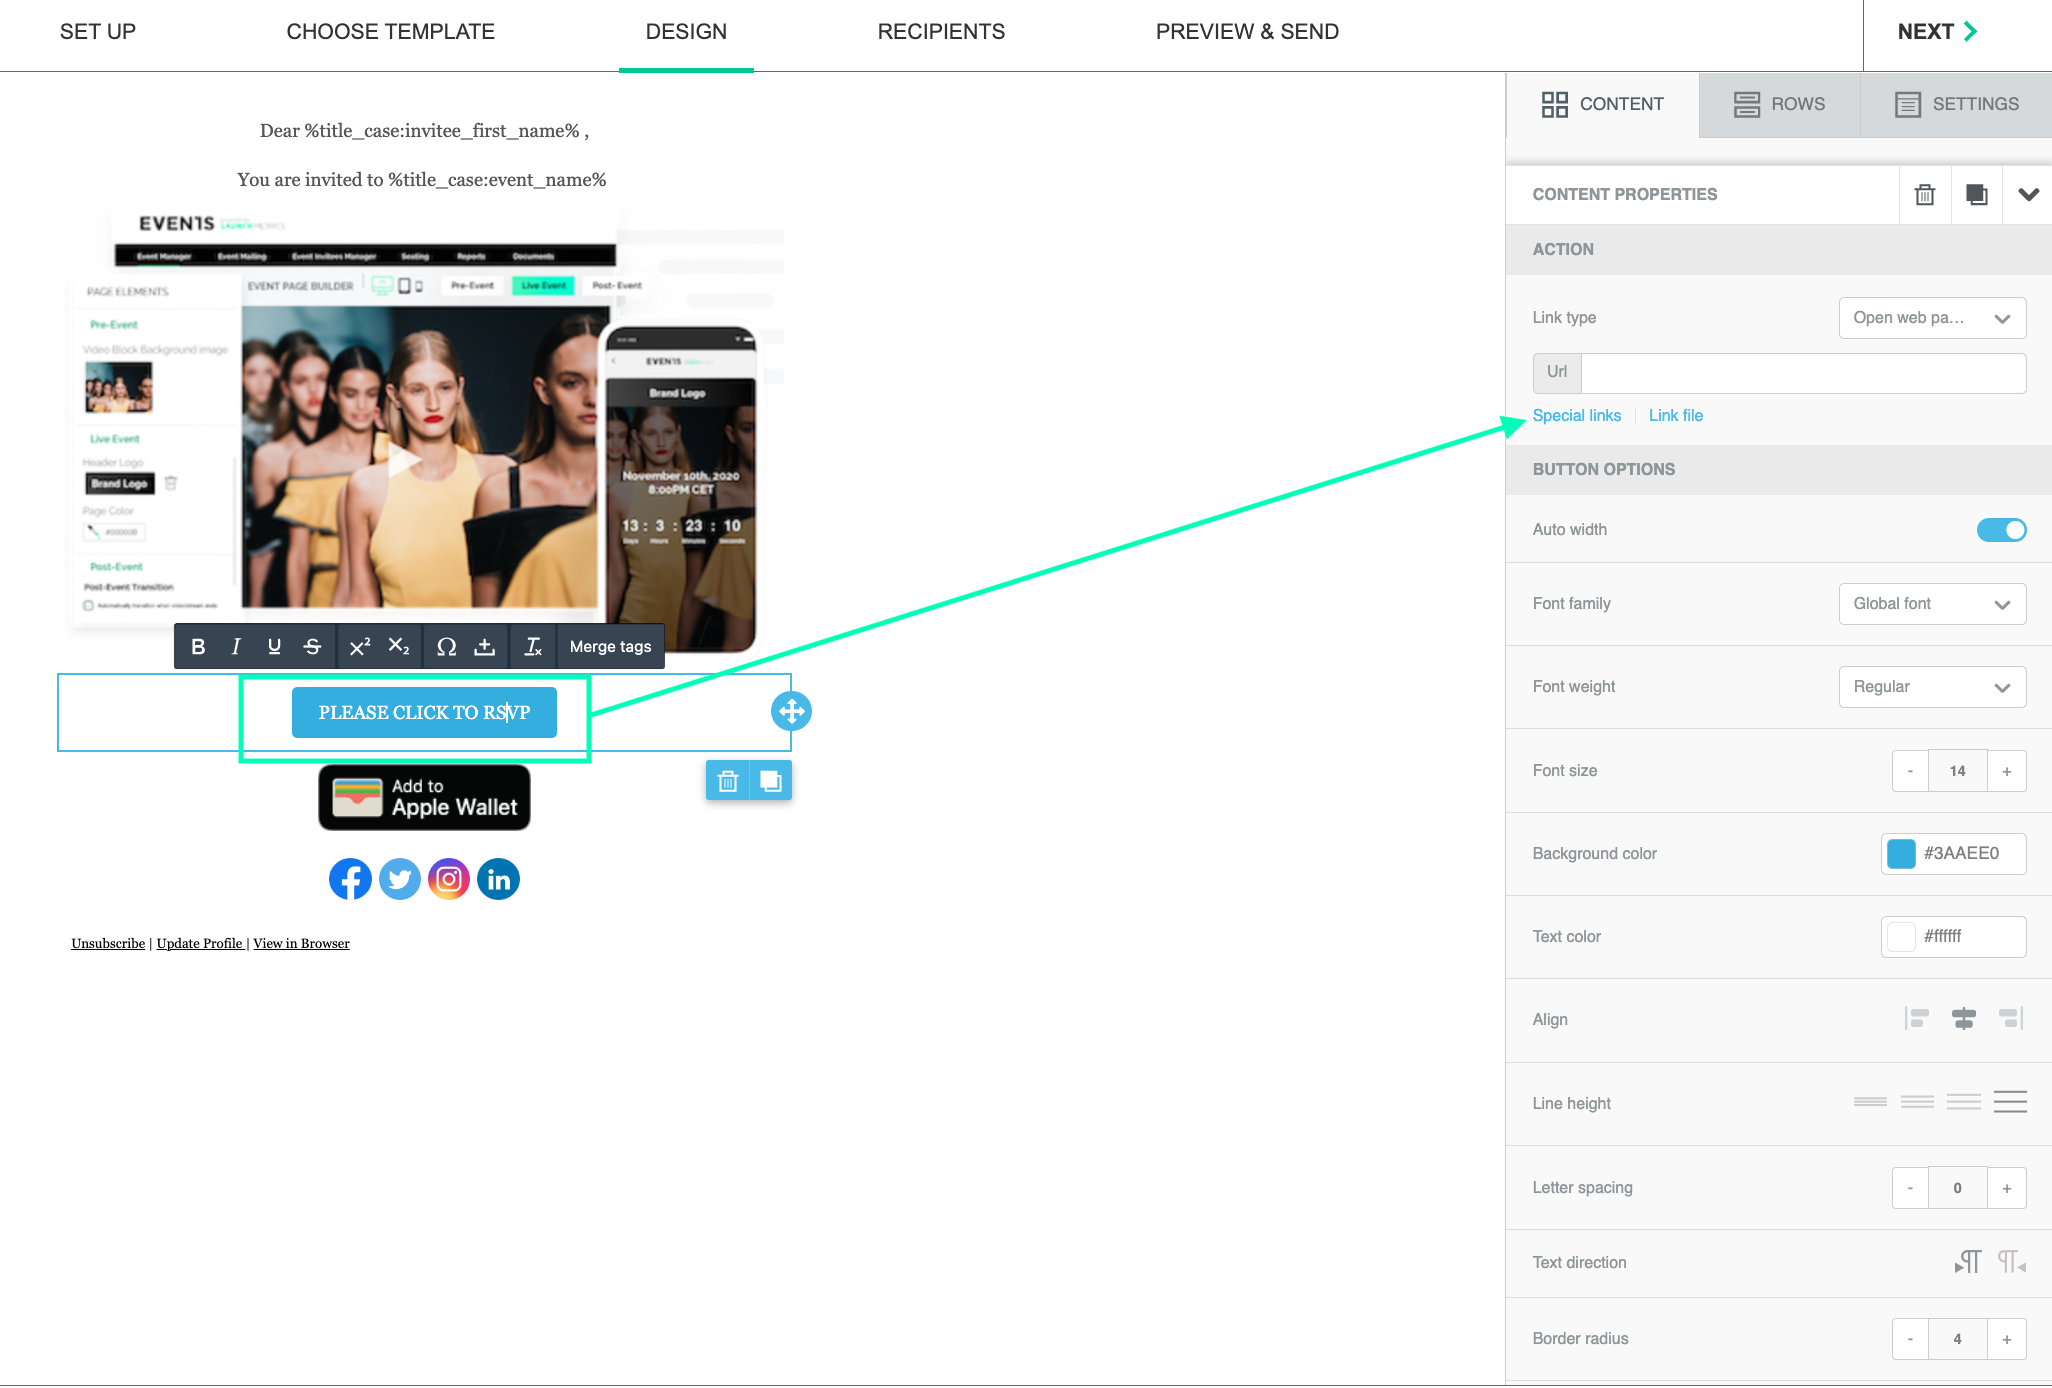
- This will open a pop up and give you a selection of "Special links", you will need to select
- You will need to click the option "+ EVENTS RSVP PORTAL LINK"
- The special link will now be applied to the button, and you will see a code in the URL box which will look like this "%event_rsvp_url%".
- You will see on the right hand side you have a number of formatting options that allow you to customise the button, such as colour, font, sizing etc. If you need any help wit customising please reach out to the support team by emailing "Support@launchmetrics.com".
- You can drag and drop the button icon into your mailer and add a "special link" that allows your Invitees to RSVP directly from your mailer. This information will update in real time, in your Invitees manager (this is typically what the Button feature is used for).
-
DIVIDER
- The divider is used to help break up your email content. You can use the content properties on the right hand side to adjust this.
- The divider is used to help break up your email content. You can use the content properties on the right hand side to adjust this.
-
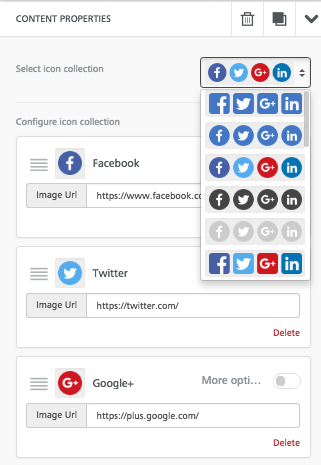
SOCIAL
- Use the content properties, to select a unique Icon collection format of social links. You can delete the icons which you will not be using, or add a new social Icon.
-
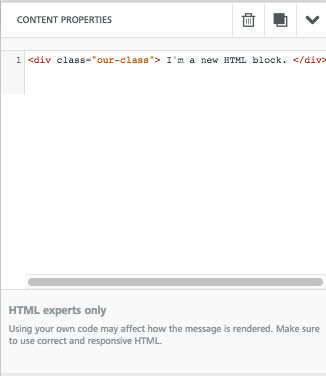
HTML
-
Paste HTML code directly into the content properties to create your mailing based on HTML.
-
Paste HTML code directly into the content properties to create your mailing based on HTML.
-
Video
- Add a video link from where you have your video posted on thee web to automatically generate a preview image of your video
- Once a link has been added, you can adjust the play button icon settings on the right hand side.
-
Icons
-
Add an icon to your mailing, you can customise this on the right hand side of your screen.
-
Add an icon to your mailing, you can customise this on the right hand side of your screen.
-
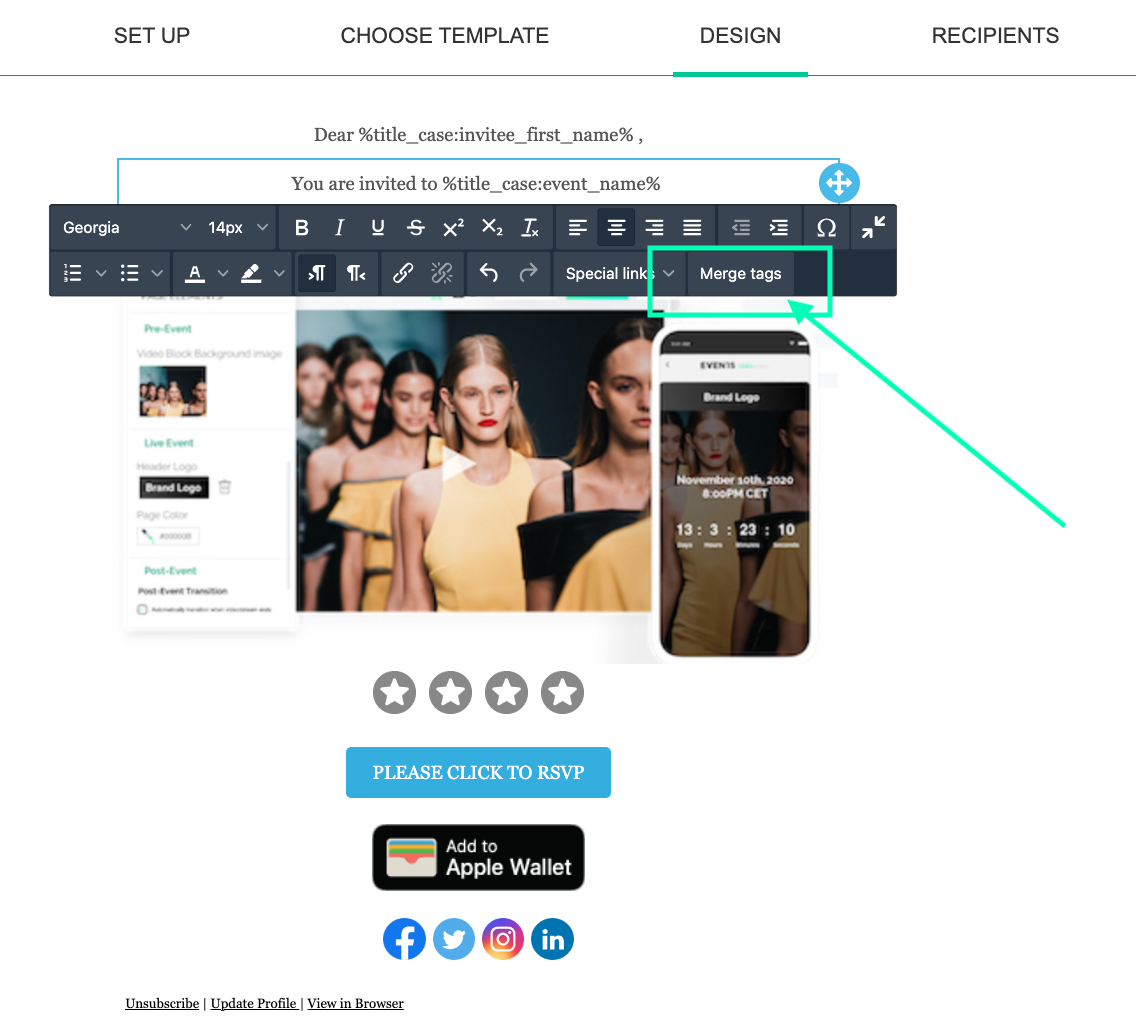
Text
- You can edit the text content of your mailing by clicking the text in your mailing.
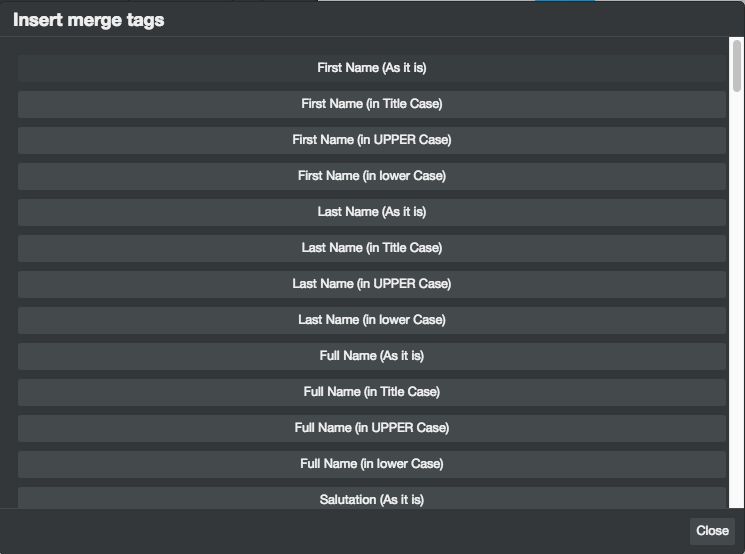
- A very useful feature you can use within the tool box, is "Merge Tags". Merge tags allow you to add custom data variables to personalise mailers. For example if you would like to include invitees first names in your mailing you can do so by using "Invitee First Name" within merge tags.
- Rows
- Rows allow you to drag and drop various formations of structure where near
- Rows allow you to drag and drop various formations of structure where near

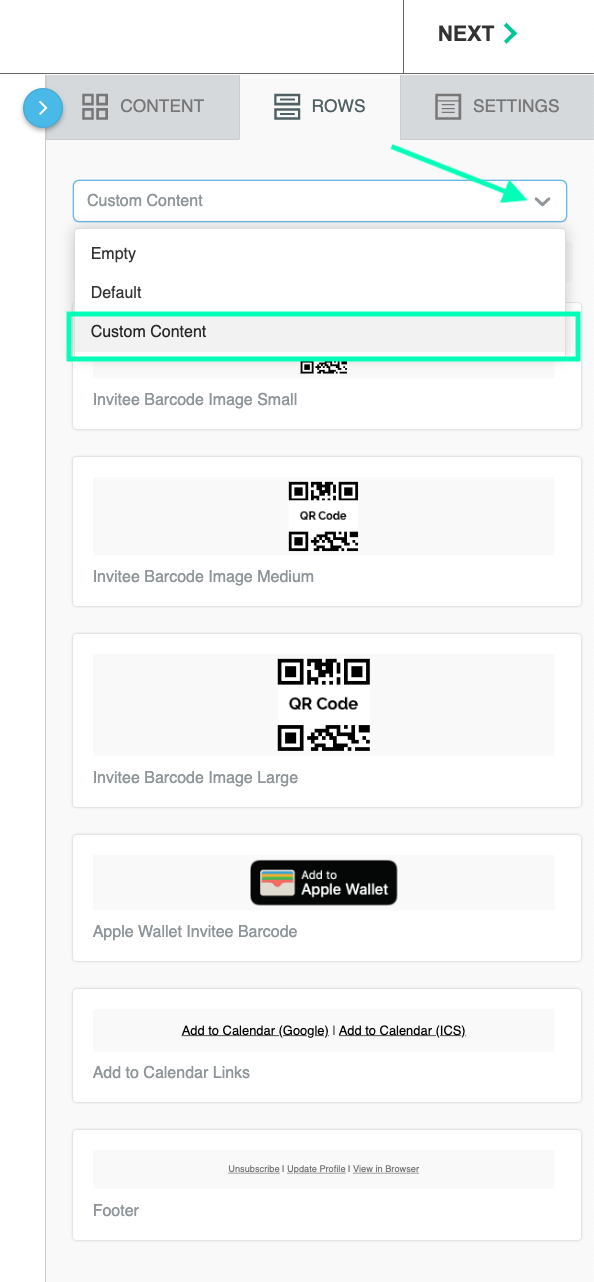
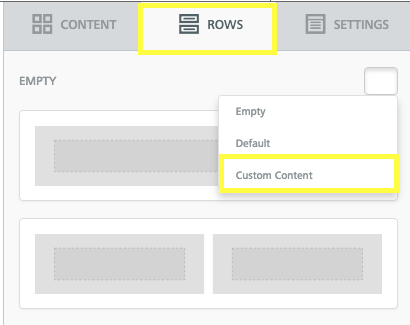
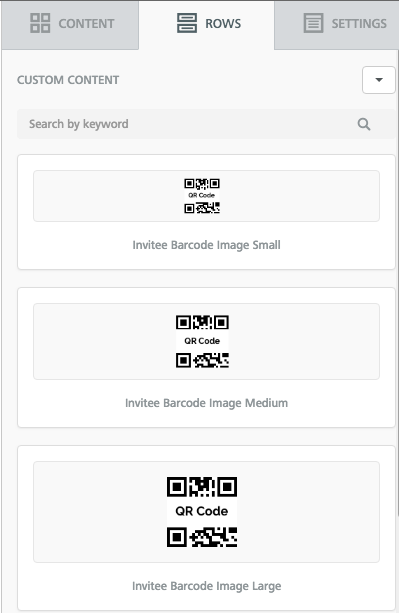
- Within Rows, you are able to add an "invitee barcode" to your mailer.
- Click your Rows tab
- Select the "EMPTY" drop down menu below rows
- Select the "Custom Content" drop down menu
- Drag and drop the invitee Barcode size you would like into your mailer
- Click your Rows tab
-
You can do the same for Apple Wallet, Calendar links, and subscribe information as shown above.
Click for additional row features
- Click into the blank space surrounding an existing Structure to either Delete, Duplicate, or Move the structures positions within your mailing design.
Within Events mailing you can action the below:
Layout Preferences
- Options Dropdown
- Edit Draft - Go back into the Draft and Edit the mailing template.
- View Recipients - This will redirect user to the 'Recipients' section to view all the recipients which have been selected to send the mailing to.
- Create Duplicate - This will create a duplicate copy of the original mailing.
- Edit Notes - Allows user to edit any internal notes that have been left regarding the contact mailing.
- Preview & Send - Allows users to preview what the mailer will look like across different devices specifically (not email clients). This is where you can send yourself a test email.
- Delete - Allows user to delete the mailing.
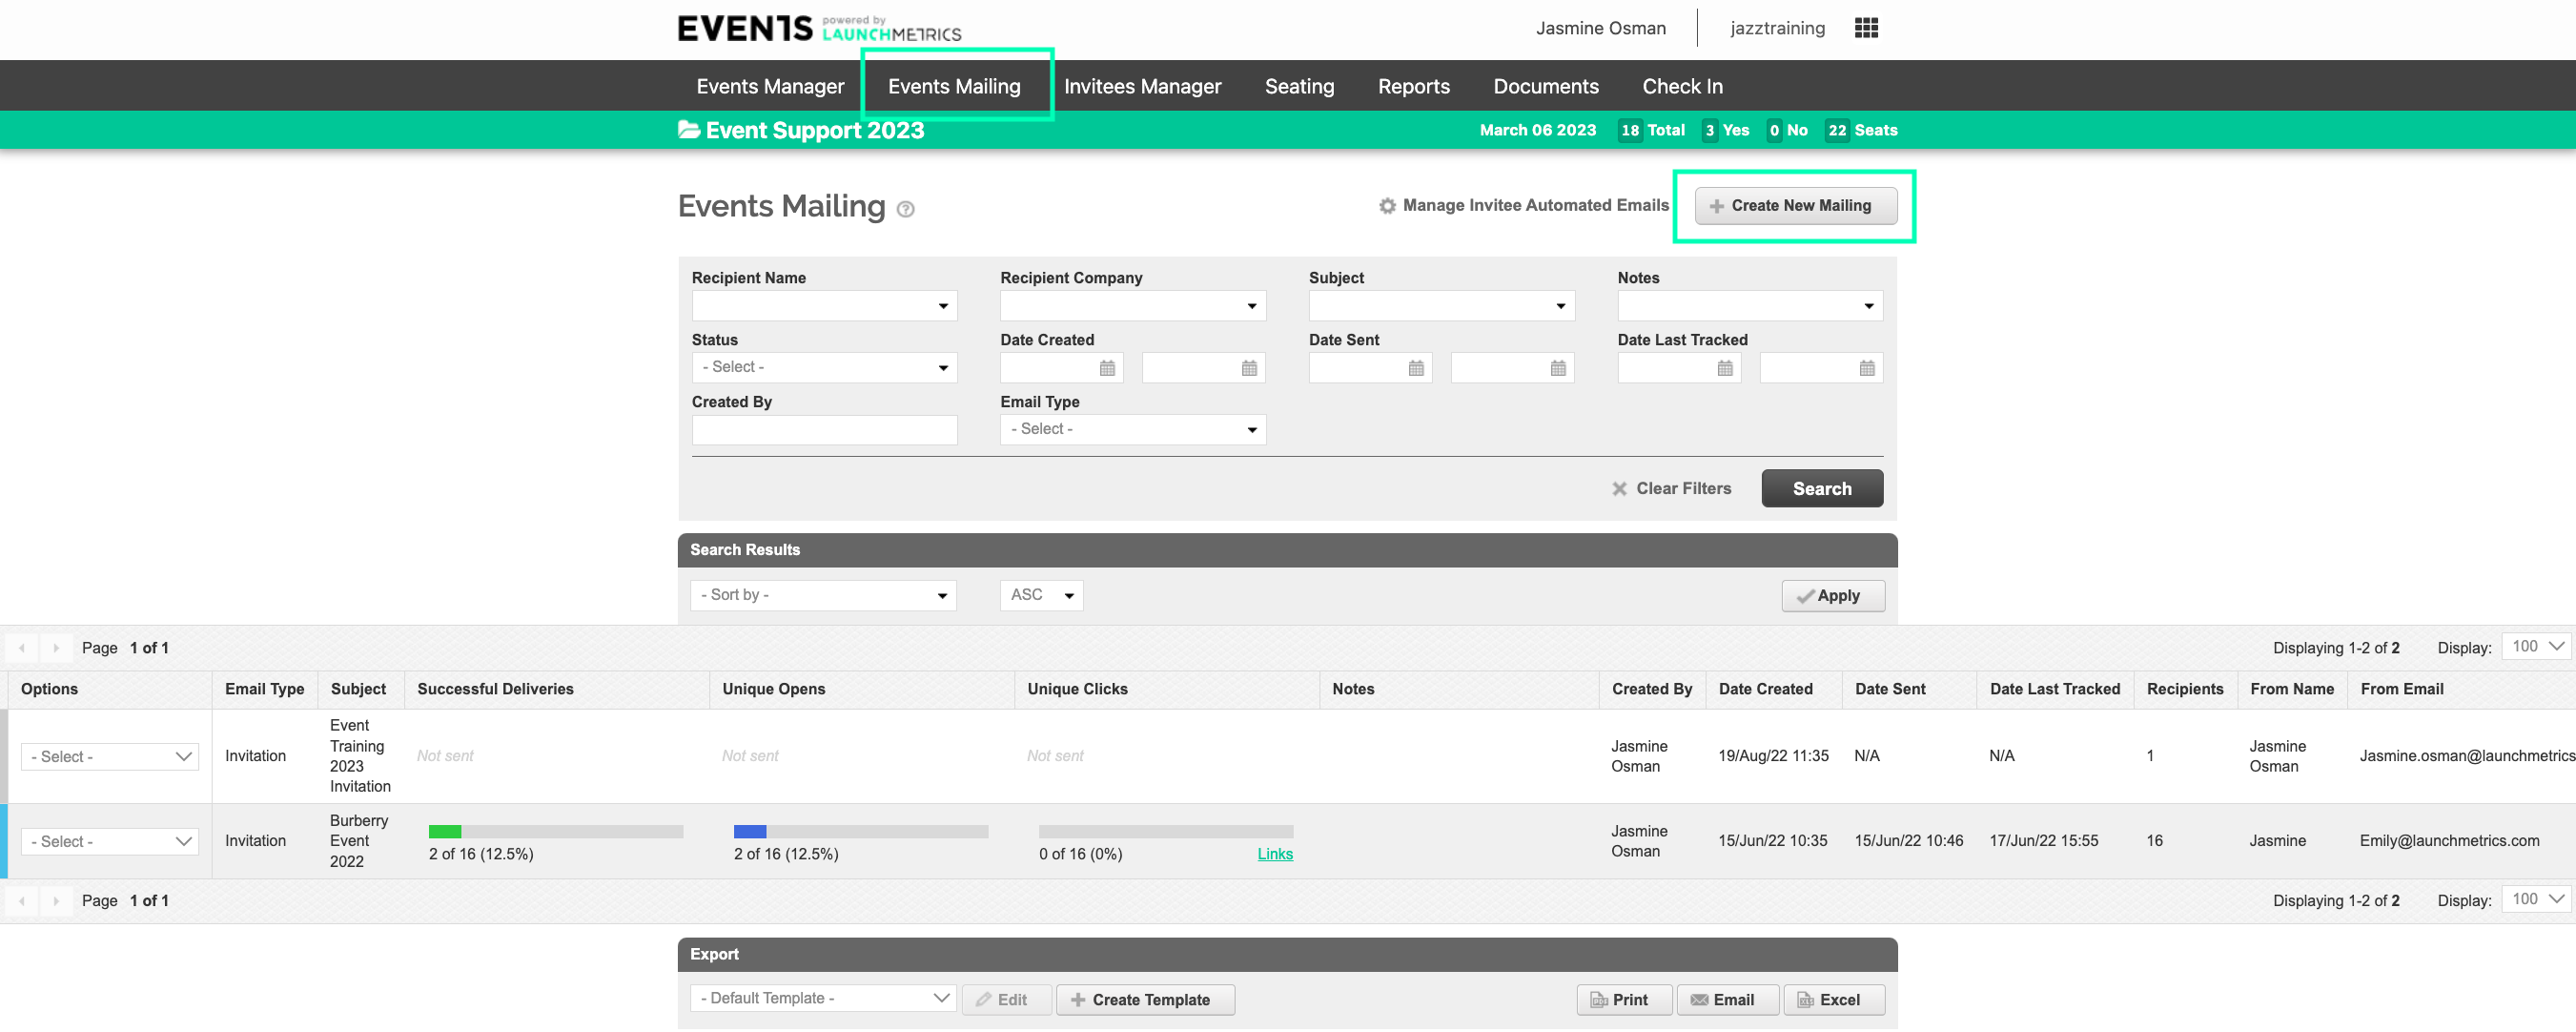
- Department - This denotes the specific system Department which the Mailer has been created within.
- Email Type - This denotes the specific Email type that has been selected for this Mailing which includes: Invitation, RSVP Follow Up, Seating Details, Event Reminder, Custom
- Subject - The Subject name of the mailing template.
- Successful Deliveries- Shows how many recipients were sent the mailing and the amount of successful deliveries. This successful delivery number is based on the response sent from the recipients email servers to the Launchmetrics email servers.
- Unique Opens - Shows the amount of recipients who have opened your email.
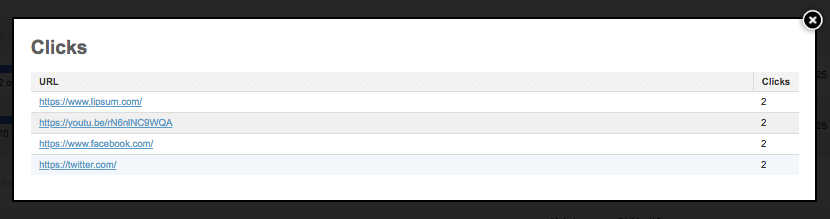
- Unique Clicks - For any links that been inserted into the body of the email, this is going to track which links have clicked. By clicking on the hyperlink "Links" , you see the amount of clicks per link.
- Notes - These Notes populates from the Internal Notes in the 'Set Up' section. This is optional and can be used to note anything specific about this mailing, for example "VIP Version with Discount Code".
- Created By - Which system Username created the mailing.
- Date Send - The date and time the mailing was sent out.
- Date Last Tracked - Shows the last time a recipient opened the mailing.
- Recipients - The total number of recipients the mailing went out to.
- From Name - This is the "From Name" that was edited in the 'Set Up' section.
- From Email - The is the "From Email" that was edited in the 'Set Up' section.
- Reply to Email - This is the "Reply-To Email" that was edited in the 'Set Up' section. Any reply to the mailer by a recipients will go directly to this email. The 'From Email' and the 'Reply to Email' do not need to be the same.

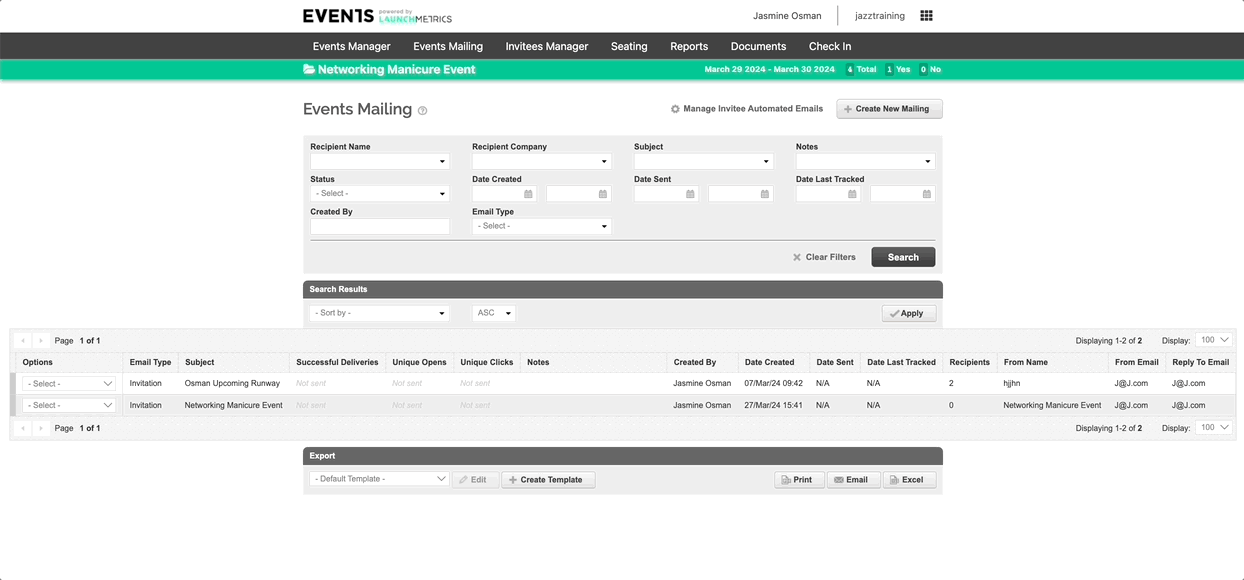
Search Features
- Recipient Name - Allows user to search by a specific recipient from your contact database to see which Event Mailing have been sent to that contact.
- Recipient Company - Allows user to search by a specific company from your contact database to see which Event Mailing have been sent to contacts that that company.
- Subject - Allows user to search specifically by the Subject of the email template.
- Notes - Allows user to search by notes that have been created. Can be used as a unique identifier to find all mailings related to 1 overall theme or subject.
- Status - Allows user to search specifically by Draft or Sent emails.
- Date Created - Allows user to search for you mailer by a specific date range which the mailer was created.
- Date Sent - Allows user to search for you mailer by a specific date range which the mailer was sent.
- Date Last Tracked - Filter out email templates based on the last read response per mailing.
Create New Mailing
- Click "Create New Mailing" to begin.
Manage Invitee Automated Emails
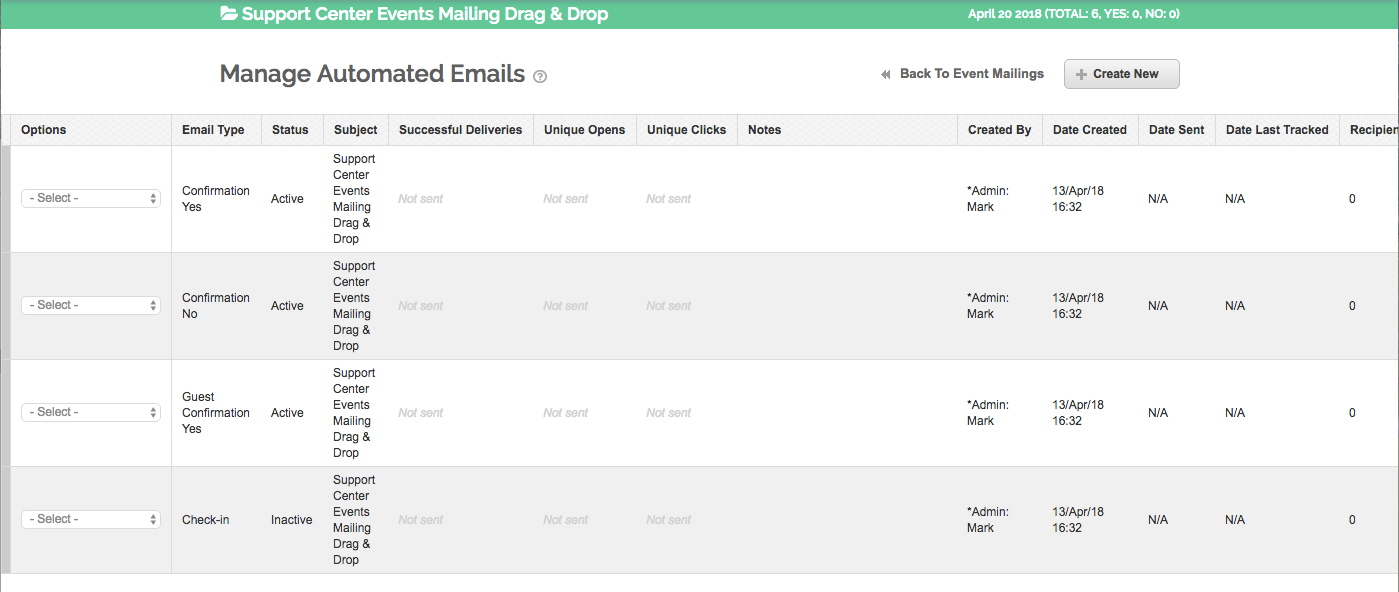
- Click the "gear icon" labeled 'Manage Invitee Automated Emails' to have complete control over all confirmation emails that would be sent automatically unless otherwise marked as 'Inactive'. By default the "Confirmation Yes", "Confirmation No", and "Guest Confirmation Yes" emails are "Active".
- User's are welcome to "Create New" email types from this list, but it is easier to simply edit these existing types.
-
Email Type
- Confirmation Yes - When an invitee confirms "Yes" to an event it will send this email automatically to confirm their attendance.
- Confirmation No - When an invitee confirms "No" to an event it will send this email automatically to confirm they are not attending.
- Guest Confirmation Yes - When the invitee guest confirms "Yes" to an event it will send this email automatically to confirm their attendance.
- Check-In - This email will get sent automatically to all invitees that get check in the day of the event through the GPS Event App.
Note - For the Check-In template, this is the only one that you will have to mark as active if you wish to use it for your event.
-
Options Dropdown per Email Type
- Mark Active or Inactive - This is where you can turn on/off the automatic emails from being sent.
- Edit Draft - Allows you to edit the template
- Email Address Settings - Allows you to choose which contact email addresses you wish to use to send them the email.
- Create Duplicate - This will create a duplicate copy of the original mailing.
- Edit Notes - Allows users to edit any internal notes that have been left regards the mailing template.
- Delete - Allows the user to delete the mailing.
Set up
Choose Template
Design
- "Rows"
- Use the Row Panel to drag and drop various formations of structure which new "Content" can be placed into.
- Click into the blank space surrounding an existing Structure to either Delete, Duplicate, or Move the structures positions within your mailing design.
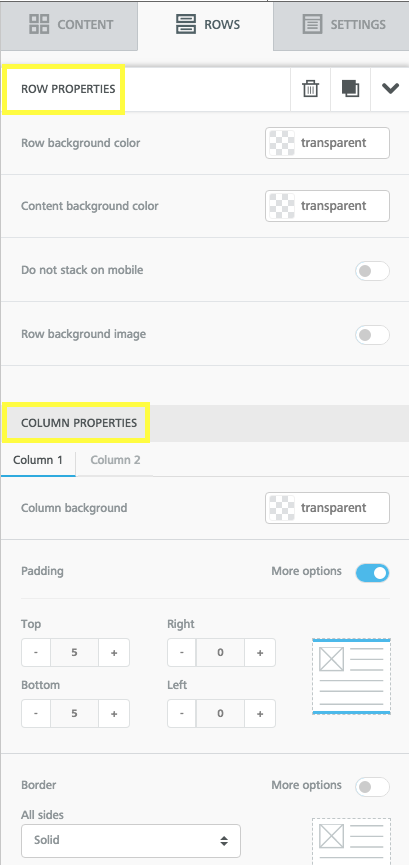
- Structure properties can be adjusted for both the Row and Column.
- Row Properties
- Row Background Color - Update the color in the surrounding white space around the structure of the Content Block
- Content Background Color - Update the color within the background of your Content Block
- Do not stack on mobile - This feature is very hand when you are using any of column structures that has more than 2 structures. If this feature is turned on, the columns will not be stack when viewed on a mobile device.
- Row Properties
NOTE - By default, columns become stacked automatically when viewing emails on a mobile device so if will override that if you turn it on.
-
- Column Properties
- Column Background - Update the color within the background on the text content only.
- Padding - Toggle Padding On or Off. If padding is turned On, you have the ability to adjust the sizing of the Content and Structure blocks.
- Border - Update the color and border lines around the content block.
- Column Properties
- You can also simply drag and drop your images.
- Content Properties
- Allows you to set your image to be automatically have the Width set OR you can toggle this and set your own Width.
- Easily align your image, left, right, or centered.
- Dynamic Image - When 'Dynamic image' is enabled, 'Url' becomes the location of a sample image shown in the editor. 'Dynamic Url' will be used in the HTML code. The size of the dynamic image will be set based on the sample one, so use a sample image of the same size.
- Alternate Text - Add text associated with the image so when they are uploading in a recipients inbox they can read a text instead of the file name is was saved as.
- Action - Hyperlink the image to do the following number of actions:
- Open a webpage
- Send an email
- Make a call
- Send SMS
- Block Options - Add padding or space on the image.
- Content Properties
- Adding a Barcode

TIP: With the Beefree integration in events mailing. All clients have access to free stock photos to import to their mailing contacts. This feature is turned on for all clients, click here for more information.
- Add a link to download a file
- If you have files that are exceed the 5MB limit to add as an attachment for each mailing contact, you can include a link to download a file directly in the body of the email.
- Using a Button
- Add a button element by dragging it from the content panel on the right.
- Click on the button to activate the content properties panel . Look for the "Actions" section. Click on "Link File".
- This will load your file manager. From, here upload your file
Note: There is a 12MB per file limit to upload.
- Then Click the "Insert" button to link it back to the button.
- Once this is one done, your recipients will have the file automatically downloaded once they click on the button.
- Using a text link
- Highlight the text that you would like to link your file and click on "insert link" icon in the toolbar.
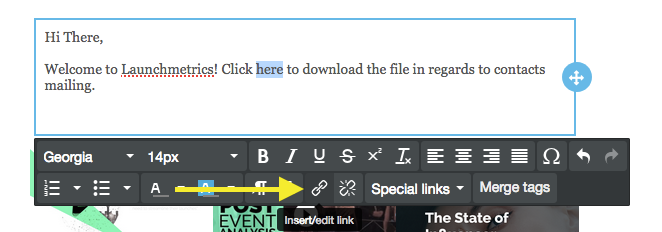
- In the "Link Type" dropdown click "File Manager". This will launch the file manager interface.
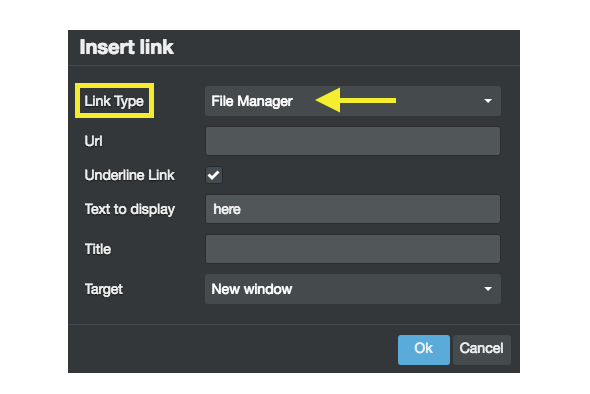
- Upload your file, and click on "Insert"

- Click on OK. Now when your recipients click on the worded link, the file will automatically download.
Note - If you have the files hosted in another site or server, you can also paste the link directly in the URL field for both options. This way, you don't have to upload it to the file manager.
- Adding a QR Code/Barcode
- This is only required if you are going to be checking in invitees using the GPS Event App.
- Click on the "Rows" tab and click on the drop down arrow on the right hand side and choose, "Custom Content".
- You then have options to choose which Invitee Barcode you want to select based on the size.
When the Design has been completed click Next to select your Mailing Recipients.
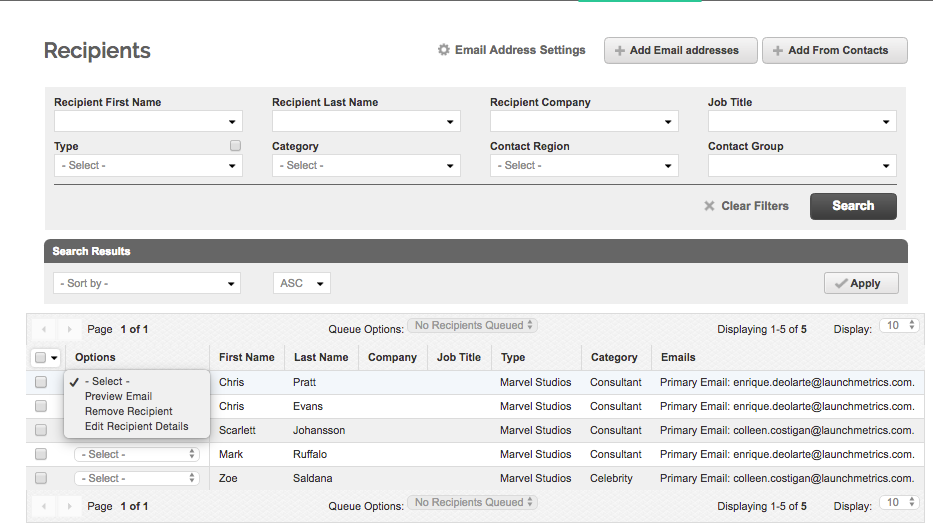
Recipients
- This is where you can edit Email Address Settings and add the recipients that you wish to send the email to.
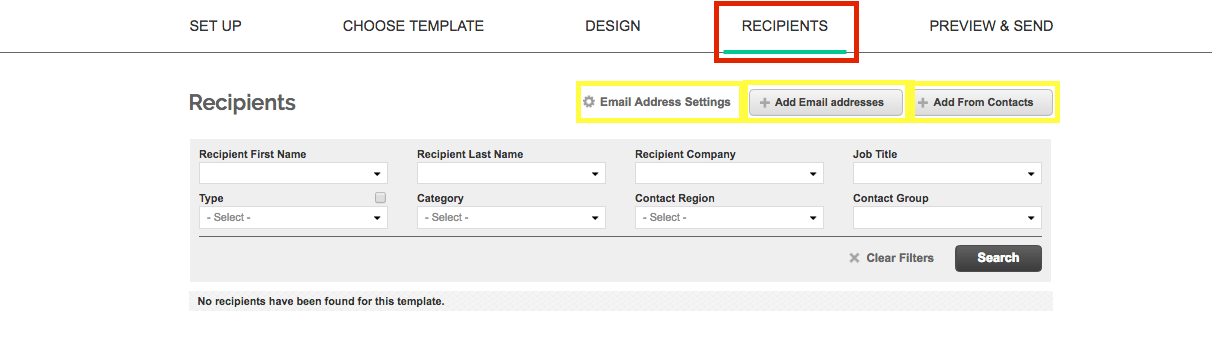
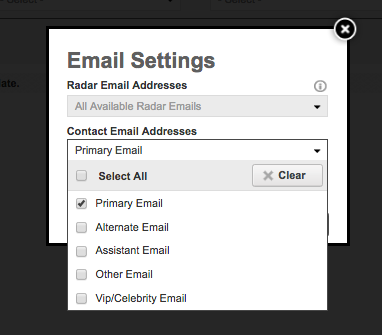
- Email Address Settings - Allows you to choose which Contact Email Address fields you wish to use to send the mailing to.
- Radar Email Addresses - This will send your mailer to the Primary Radar Email address of all recipients that are linked to their GPS Radar account.
- Contact Email Addresses - You can select which email address you wish to send the mailing to:
- Primary Email
- Alternate Email
- Assistant Email
- Other Email
- VIP/ Celebrity Email
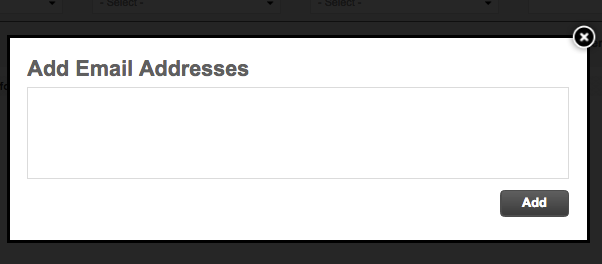
- Add Email Addresses
- This allows users to copy and paste a list of just email addresses not tied to Contacts from the Contact database.
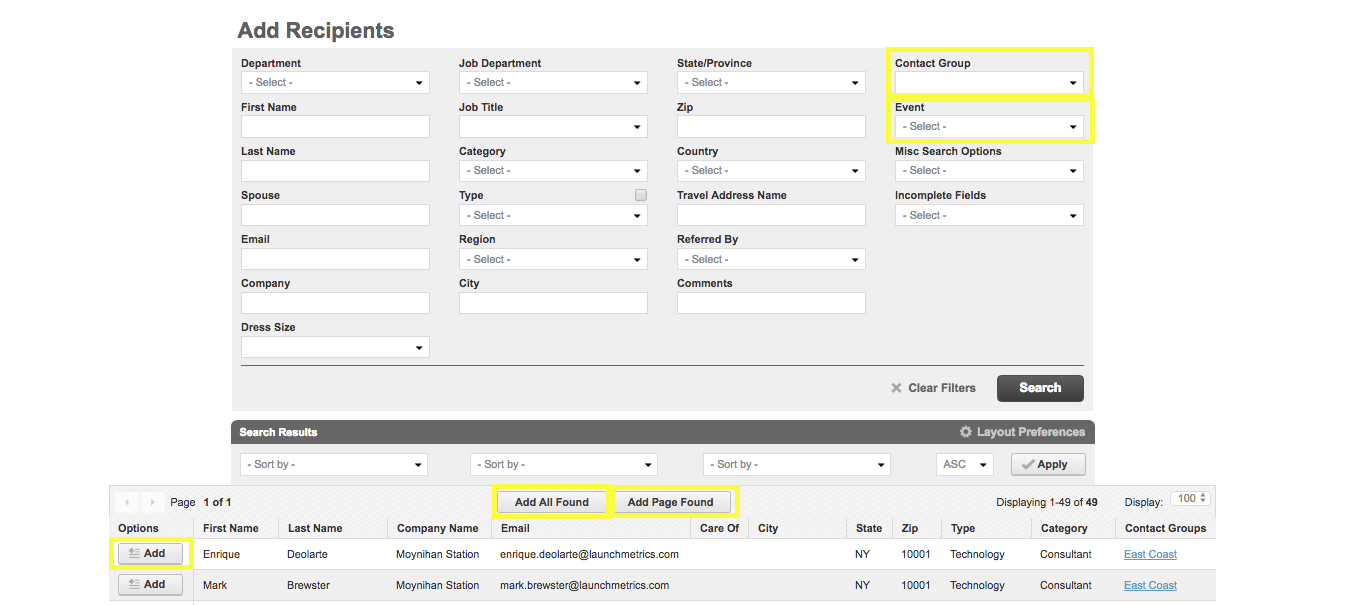
- Add from Contacts
- This allows users to add recipients directly from their Contact Database.
- Search and Click "Add" one at a time or "Add All Found Results" or "Add Page Found" results.
- Users can also add recipients from a Contact Group or from an Event.
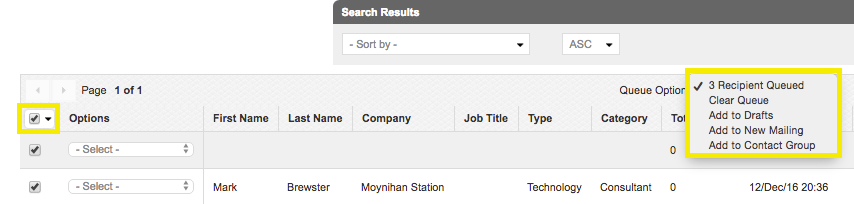
- Once Contacts have been added to your recipients list, use the options dropdown per contact or the Queue options to remove contacts from the list or preview a specific recipients email.
Preview & Send
- Once recipients have been added to the recipient list, you will then be able to preview and Send your Events Mailing.
- Use the dropdown in the top right corner to select any Recipient to do an email Preview.
- Click the "Send Test" button to send yourself a test email.
- Click the Print Icon to print out a copy of what the email looks like.
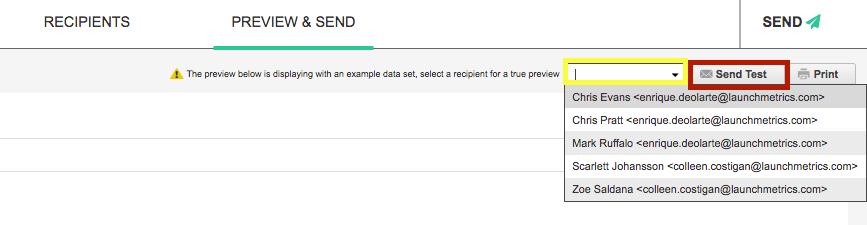
- Click the Desktop, Table, Mobile device icon to get a look at how the mailing will render depending on the device the recipient is viewing the email.

- Click "Send" to finally send your email to all of your recipients.
Review Email
- Select "Review Email" from the options dropdown next to your mailing in the Mailing Manager

- Review - Allows you to Preview the email again.
- Recipients - Gives you a snapshot of the success of the mailing.
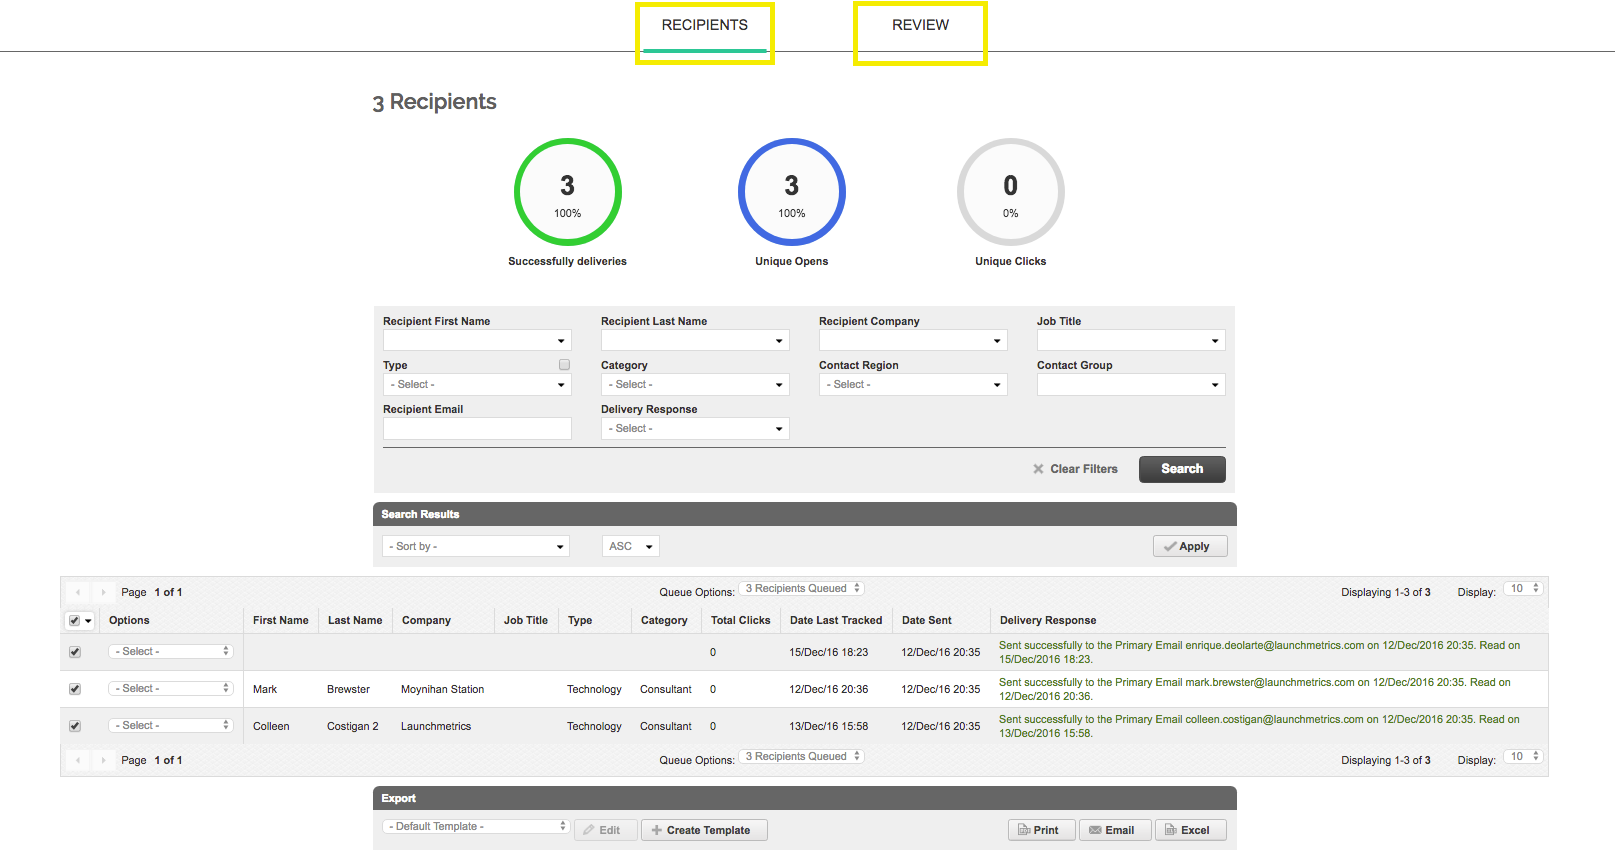
- If you queue all the recipients under queue options you will have the following actions available:
- Add to Drafts - Add recipients to a current mailing draft that is incomplete.
- Add to a New Mailing - Add recipients to a new mailing template
- Add to Contact Group - Add recipients to either an existing group or add them to a new one.