
How To Start The Create Send Out Process
Send Outs can be started in 3 different ways:
- Hover over the Send Outs tab at the top of the Samples module and click 'Create Send Out'.
- Within the 'Send Out Manager', click the 'Create Send Out' button.
- Within the 'Sample Manager', users can search and queue samples that are needed first. After queuing the appropriate samples needed, use the 'Queue Options' dropdown to select 'Create Send Out'.

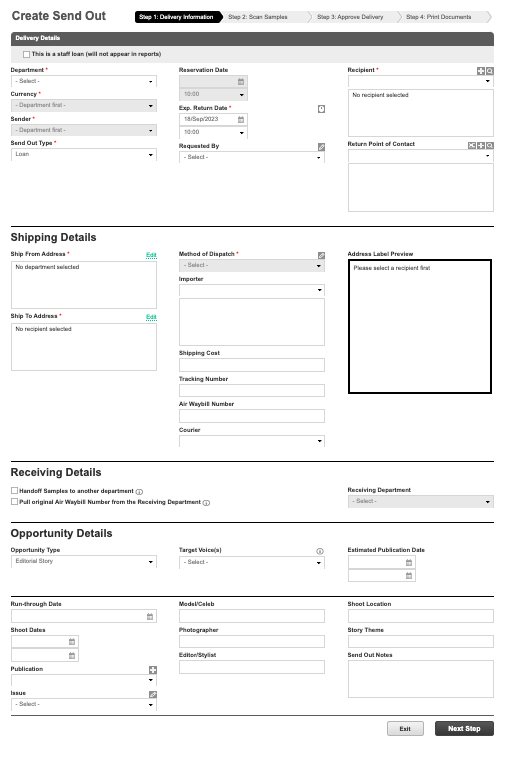
Step 1 - Delivery Information
The 'Create Send Out' Delivery Information step is organized in 4 sections:
- Basic Delivery Details
- Shipping Details
- Receiving Details
- Opportunity Details
Switch between the tabs below to view further information on:
- Delivery Details
- Shipping Details
- Receiving Details
- Opportunity Details
Delivery Details
- Staff Loan: Check the box under 'Delivery Details' to select if you want to mark the send out as a Staff Loan (meaning it is within your company and won't be reflected in reports).
- Department: Define which department you want to send samples from. Once selected, you will only be able to select contacts/companies, samples, ad currencies from this department.
- Currency: The Currency will auto-select based on your department. You can select any other currency enabled in the department of the Send Out.
- Sender: The Sender selected, will automatically populate with the contact details of whatever username is logged in at the time, but other users can also be selected from the drop-down.
-
Delivery Type: Choose from the following options:
- Loan: Send samples out that you expect to be returned to you.
- Transfer: Send samples out that you do not expect to be returned to you. If 'Transfer' is done by a sample owner, it leads to both the removal of the sample from the Department Inventory but also an ownership transfer. If a 'Transfer' is done by a non sample owner, it would lead only to a removal of the sample from the Department Inventory.
-
Reservation: Send samples out at a later date and reserve them so nobody else can send them out during that time. If Reservation is selected the Reservation Date option will be allowed to be selected denoting a future date that the Samples will; be reserved on.
-
Exp. Return Date: Use this field to denote the expected date that the samples are meant to be returned. The Clock icon will allow users to set a Default Lon Period to always pre-populate a specific Days, Weeks, Months time frame for samples to be returned. This will apply to all users.
The Delivery Type's below are considered End Of Life actions. The samples will be removed from the Sample Manager Inventory and the samples will only be found within the Send-Out Reports.
Learn more about Sample Recovery after an EOL
Learn more about Sample End of Life manager
- Sale: Sell samples that you do not expect to be returned. If marked as sold by mistake, this sample can be recovered. Learn more about marking samples as Sold.
- Return to Vendor: Send samples back to their manufacturer. If marked as Returned to Vendor by mistake, this sample can be recovered.
- Send to Archive: Select this loan type when you no longer wish for the samples to remain in your active inventory but do not want to remove them from your system. You can view archived inventory at any time from the End of Life Manager and Send-Out Report. Samples can be recovered if needed.
- Write off: Select this loan type when you do not expect the samples to be returned. This option is usually used to record when a sample has been lost or damaged beyond repair. You can recover samples back to your inventory if needed.
- Gift: Select this loan type when you do not expect the samples to be returned. You can recover samples back to your inventory if needed.
- Requested By: This field allows users to denote any specific internal contacts that have request the Send Out to be made. Use the pencil icon to create additional Requested By values.
- Recipient: Select the correct recipient which the samples will be sent to. Contacts can be created by using the + icon or searched for within the Contact Manager by using the magnify icon.
- Return Point of Contact: This option is used for denoting the best point of contact that should be reached out to and responsible for returning samples, if that differs from the Recipient selected.
Shipping Details
All fields marked with a red asterisk are required.
- Method of Dispatch: Select the method in which the Samples will be delivered to recipients. Please note that Launchmetrics does not integrate with any shipping providers, and this is all for internal reference.
- Ship From Address: "Department Address" (by default if department is selected). You also have the option to select an "Alternative Company Address" (allowing you to select Company, Home or Other), OR "Alternative Contact Address".
- Ship To Address: Based on the Recipient that is select, the Company Address associated with that recipient will be populated. Users can select an Alternate Contact Address or Alternate Company Addresses of where the samples must be sent to. When selected the Ship To field will able to be utilized to select the alternate address. The Address Label Preview can also be edited to provide flexibility to edit exactly what the shipping address label needs to reflect.
- Shipping Costs: Keep track of shipping costs associated with the Send Out.
- Tracking Number: Keep track of package tracking numbers associated with the Send Out. Again, please note that Launchmetrics does not integrate with any shipping providers, and this is all for internal reference.
Receiving Details
-
Handoff Samples to another department: This option is a quick and great way to easily put samples into another system department that is receivingthe samples without having to go to the Return Samples section and "Receive" the samples into the other system Department.
- This should only be used when samples are physically handed off internal to colleagues in other company departments (i.e. a PR coordinating handing off samples to a Marketing team member). If enabled, the Receiving Department field is available to select which system department, a copy of the sample will be placed in. The "Handoff" option should never be used when samples are being sent between different offices in multiple locations.
- Pull original Air Waybill Number from the Receiving Department: This feature must be enabled by an admin. It is used to keep logs of associated deliveries for duty drawback purposes. If samples are eligible for duty drawback, use this to pull the original Air Waybill Number that was indicated on the Send Out made from the original sending department (whom is now receiving it back). This creates a paper trail to prove that it's the same sample being returned back.
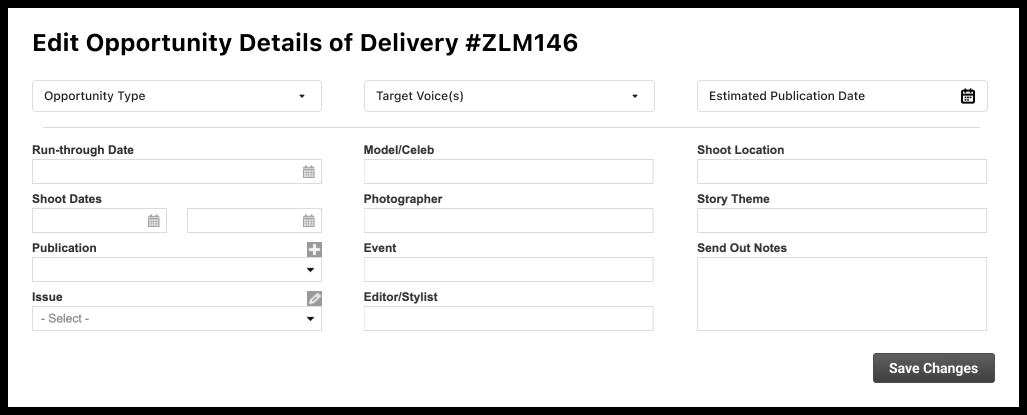
Opportunity Details
Complete any of the various opportunity detail fields to input more information on the purpose of the send out. The benefit of using these fields will allow greater visibility on future Send Out Reporting and allow you to better allocate your samples to optimize their activations.
- Choose an Opportunity Type to better refine the information to provide to qualify the opportunity.
- You can choose between:
- Editorial Story
- Celebrity Dressing
- Product Seeding/Gifting
- Internal
- Other
- By default, the opportunity type is "None/Empty".
- Any send out created with former Editorial details will be categorized under "None/Empty" for reporting purposes.
- By default, Return to vendor, Send to archive, and Write-off send out types will be set to internal.
- The opportunity type will appear on the delivery memo and any other send-out documents generated where the editorial fields appear today.
- Any specific fields can be manually added to your document or report layout.
- You can choose between:
-
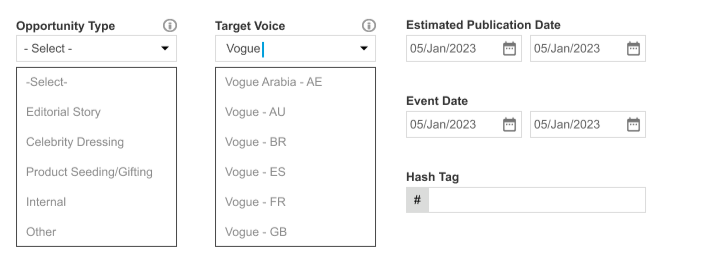
Target Voice will by default match your send out recipient's company-linked Voice.
- If the user makes a change of recipient, as long as the previous selection of the recipient’s voices matches what was selected in the Target Voice(s) dropdown, we reset the selection. Otherwise, we assume that the user has made changes to the Target Voice(s) which we do not want to overwrite.
- You can also search our Voices database, your contacts linked to Voices will show up first.
- You can select one or multiple Voices.
- Estimated Publication Date allows to define a date range for an expected placement.
- By default, opportunity details are not required but upon request can be set up as mandatory.
Step 2 - Scan Sample
 Samples can be added to a Send Out in a variety of ways. Successfully added Samples will be listed in the Scan Log and shown in the Selected Samples List:
- Scan a printed Launchmetrics barcode tag directly in the 'Input Barcode' text box. Barcode number can also be typed directly in this section followed by clicking 'Scan'.
- If Samples have been queued directly in the Sample Manager, use the Add Queued Samples option.
- Create & Add Sample allows users to create a new sample and add to the Send Out directly from this step.
- Add By Look allows users to add samples based on Looks that have been created for specific Collections.
- Add from Inventory allows users to search directly from their Sample Manager to select the samples needed.
To complete the Send Out, click on Next Step.
Step 3 - Approve Delivery
Step is only required if Pending Send Outs is enabled

If your department is configured to have Pending Send Outs enabled, an extra approval step will be in place. In this case, a Confirmed Tracking Number, will need to be submitted before the Send Out is approved. If this is not submitted, the Send Out Status will be marked as "Pending" and not "Open".
- The use case of this feature is intended to give an extra step to confirm exactly when a created Send Out has physically left the office.
- If you do not wish to have this "Pending step", please speak with your dedicated Launchmetrics Customer Success Manager or contact Launchmetrics Support.
*Please note that if you are using Gateway, these are the same steps you would take when loaning/transferring your Samples from one Launchmetrics site to another.
- The sending user would need to create a send out using the above instructions, and share the delivery memo with the receiving user.
- The receiving user would then need to scan the delivery memo code into their returns tab, making sure to select the correct department.
- To view our "Returning samples" manual, please click here.
Step 4 (or 3) - Print Documents

- Once Step 2 (or Step 3 if Pending Send Outs is enabled) has been completed the Send Out process has been Completed and the Delivery is Approved.
- From this window, users have the options to:
- Print Delivery Memo
- Print Pro-Forma Invoice
- Print Recipient Address Labels
- Print All Sample Barcode Labels that are on the Delivery